
LDAP Integration with ServiceNow
Administrators integrate ServiceNow with LDAP directory to streamline the user login process and to automate administrative tasks such as creating users. LDAP integration allows ServiceNow to use your existing LDAP server as the master source of user data.
PREREQUISITES
The LDAP integration requires:
- An LDAP v3 compliant directory services server
- Allows inbound network access through the firewall (Service Now to LDAP)
- Service Now IP addresses to be allowed are 199.x.x.x (obtain from HI)
- The external IP address or fully-qualified domain name of the LDAP server
- A read-only LDAP account of your choosing
- Secure connection between Service Now and LDAP Server’s over internet.
There are two ways by which secure connection can be achieved.
# Secure Connection through SSL:
- A PKI certificate is required, to secure communication
# Secure Connection through IPsec VPN tunnel:
- No certificate is required.

For more information Click Here
There are two aspects to the integration:
- Data population
- Authentication
Data Population
Integration to the LDAP servers allows one to quickly and easily populate ServiceNow with user records from the existing LDAP database. In order to avoid data inconsistencies, Configuration flags are present to help either create OR ignore/skip of the incoming LDAP records to be processed. One can also limit the data the integration imports by specifying LDAP attributes. If there are not attributes specified, then all the objects are considered for import under process.
Authentication
In an LDAP integrated ServiceNow environment, When the users try to log in, their credentials are passed on to all the defined LDAP servers. The LDAP server, after processing the credentials, sends a response providing the authorization status, accordingly to which the access to ServiceNow application is granted.

Steps to establish LDAP Integration
Step 1. Determine the LDAP Communication Channel
A SSL-encrypted LDAP integration (LDAPS) communicates over TCP on port 636 by default. This communication channel requires a certificate. Go to Step 2 to obtain and upload the certificate. A VPN connection communicates over an IPSEC tunnel. One need to Purchase or create an IPSEC tunnel on their local network. Here, we will discuss LDAP Integration by PEM certificate. PEM certificate is one of a kind of X.509 Certificate and can be obtained by the customer.
Step 2. Upload the X.509 Certificate
If not done already as part of the ServiceNow Go-Live activities checklist, an administrator can:
- Purchase or generate an SSL certificate for the LDAP server.
- Then, Upload the new LDAP certificate on the server.
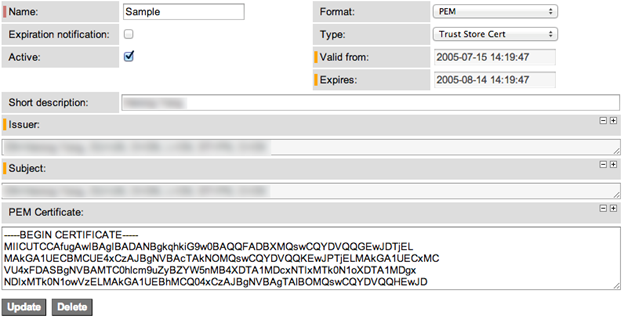
Field Description
Name – Name for the certificate, should be unique.
Expiration notification – to send notification on event of certificate expiration, in advance.
Active – Use the certificate for signing requests and secure communications.
Short Description [Optional] – Description containing any attributes of the certificate like requester name or server name.
Issuer – ServiceNow automatically adds the certificate issuer to this field, as soon as the certificate is attached.
Subject – ServiceNow automatically adds the certificate subject to this field, as soon as the certificate is attached.
PEM Certificate – In case of PEM certificate, copy the certificate content from beginning to the end of the certificate. ServiceNow automatically decodes the certificate to populate the Issuer and Subject fields.
Format – Select the certificate format. ServiceNow supports the PEM and DER formats. See Generate a Certificate.
Type – Select the certificate container. ServiceNow recognizes certificates from trust stores, Java key store, and PKCS12 key stores.
Valid from – Data from the certificate attribute ‘Valid from’, auto-populated by ServiceNow.
Expires – Data from the certificate attribute ‘Expiration date’, auto-populated by ServiceNow.
Step 3. Define the LDAP Server
To create a new LDAP server record in ServiceNow:
- Navigate to System LDAP > Create New Server.
- Specify the values in the connection settings.
- Click Submit.
Field Description
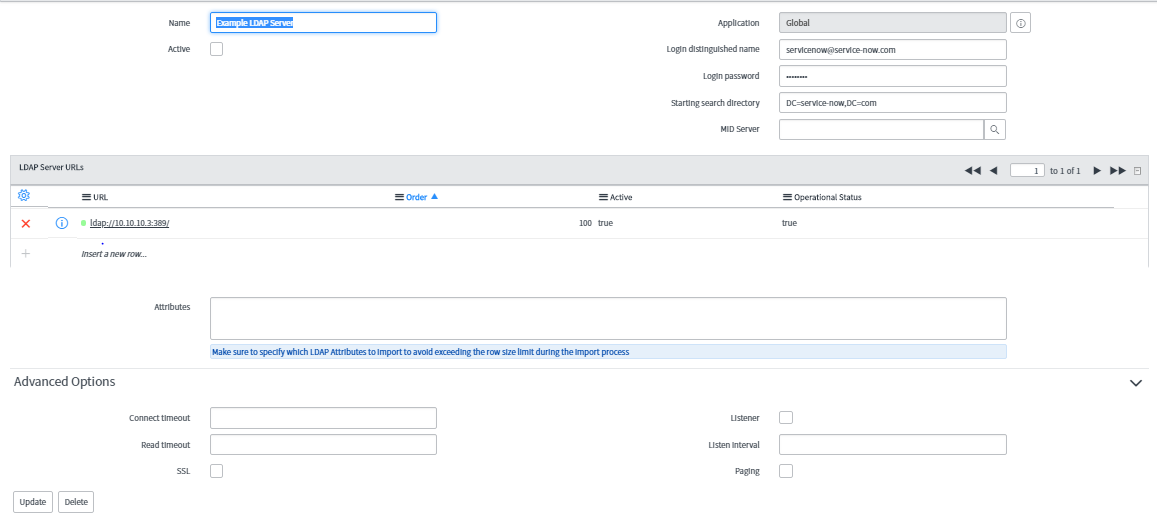
Type of LDAP Server – Defaults to Active Directory (ADAM). Select Other if this does not apply to your LDAP configuration.
Server Name – Enter a name to identify this LDAP server in lists and log details. For example, LDAP Asia identifies the corporate directory of users in Asia.
Server URL – Specify the communication protocol, the LDAP server IP address or fully-qualified domain name, and communication port on which the LDAP server listens. For example :ldap://host-name:389/
Starting search directory – Specify the directory (or Relative Distinguished Name) where ServiceNow begins searching for users and/or groups. In the company’s LDAP directory, there are several OU’s under the root:
ou=computers, ou=users, ou=servers, and ou=misc. Since all company users are located in the users OU, the starting search directory is ou=users,dc=domain,dc=com.
This prevents the LDAP browser tool from having to search through the other OUs, saving time and resources.
After saving all the details, we will get the screen which have fields like Login distinguish Name, password etc.
MID Server – Select the MID Server to be used to connect to the LDAP Server.
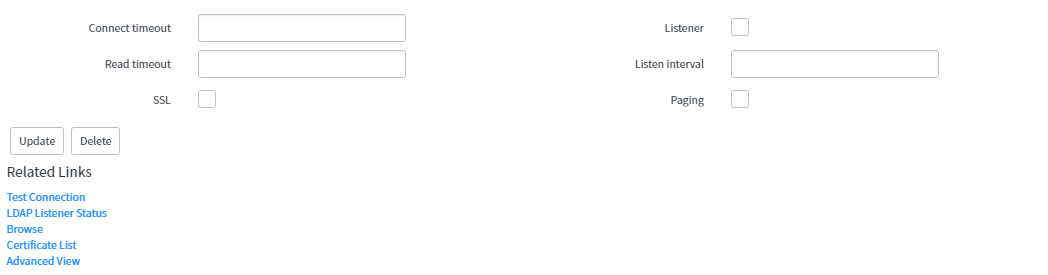
Connect timeout – Specify the number of seconds the integration must make an LDAP connection. The integration stops the current connection request after the request exceeds the connection timeout.
Read timeout – Specify the number of seconds the integration must read LDAP data, exceeding which it stops reading the data.
SSL – Enable to make an SSL-encrypted connection initiated by the LDAP Server.
Note: The SSL connection is not available with the MID Server.
Listener – Select this check box to enable the integration to periodically poll Microsoft Active Directory for changes.
Note: The listener is not available with the MID Server.
Listen interval – Number of minutes the integration listens for LDAP data for every connection, exceeding which it stops reading the data.
Paging – split LDAP attribute data into multiple result sets rather than submitting multiple sets.
Step 4. Provide LDAP server login credentials
The LDAP login credentials determine what organizational units the integration can see. Servers that allow anonymous login generally limit the organizational unit (OU) data available to anonymous connections.
- Navigate to System LDAP > LDAP Servers from the filter navigator.
- Select the LDAP server to configure.
- Under Login distinguished name, provide user credentials of an account which has read access to the directory levels from where users or groups needs to be imported. If not provided, an anonymous login to the LDAP server is attempted. The Login distinguished name fields accept several formats.
For Microsoft Active Directory (AD) server, format can be:
[email protected], domain\user
cn=user,ou=users,dc=domain,dc=com
For any other, the username should be provided as the full distinguished name:
cn=user,ou=users,dc=domain,dc=com - In Login password, provide password for the LDAP user.
If you provide an LDAP password, the integration performs a Simple Bind operation. Else the LDAP server must allow anonymous login, Otherwise the integration won’t bind to the LDAP server. - Select the Active check box.
- Click Update.
Step 5. Test the Connection
ServiceNow performs the test connection automatically every time a user opens the LDAP Server form.
Error messages appear on the form if there are any issues connecting to the LDAP server.
- Navigate to System LDAP > LDAP Servers using filter navigator.
- Select the LDAP server to test.
- Under Related Links, click Test connection.
- You can use Browse option to confirm about the appropriate LDAP directory structure visibility.
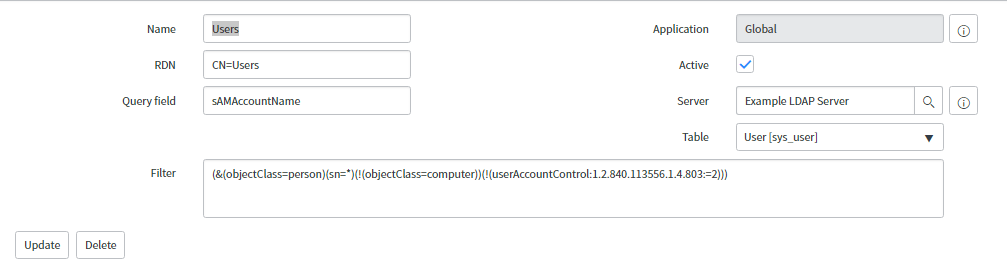
Step 6. Define OUs within the Server
An OU definition specifies the LDAP source directories available to the integration. OU definitions contains locations, people or user groups. Every LDAP server definition contains two OU definitions viz., one for importing groups into the system, And the other for users.
- Navigate to System LDAP > LDAP Servers using filter navigator.
- Select the LDAP server which needs to be configured.
- Under related list, Select Groups or Users sample OU definition.
- Complete the LDAP OU Definition form.
- Click Update.
- From Dublin onwards, the related link is not listed, and the connection is automatically tested.
Prior to Dublin, need to navigate to Related Links and click Test connection to verify the connection. - Under Related Links, click Browse to view records returned through the OU definition.
Field Description
Name – Integration name to be used when referring this OU, record created becomes an LDAP target in the data source record.
RDN – Relative distinguished name for the subdirectory to be searched.
Query field – attribute against which the records are queried – must be unique under all the domains/instances used.
Active – activate the OU definition allowing administrators to test data import.
Table – ServiceNow table receiving the mapped data from the LDAP server. Select required users and groups.
Filter – LDAP filter string to select specific records to import from the OU.
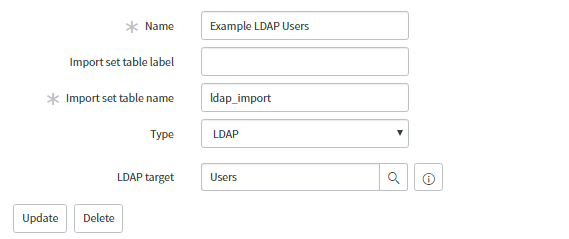
Step 7. Create a Data Source
Each LDAP OU definition has its own related list of data sources.
To create a new data source:
- Navigate to System LDAP > LDAP Servers.
- Select the LDAP server to configure.
- In the LDAP OU Definitions related list, select an item, such as Groups or Users.
- In the Data Sources related list, click New.
- Complete the Data Source form (see table).
- Click Submit.
- Under Related Links, click Test Load 20 Records to test whether the data source can bring LDAP data into the import table.
Field Description
Name – Integration name used when referring to this data source.
Import set table name – staging table where ServiceNow temporarily places the imported LDAP records and attributes.
Type – Select LDAP – specifies that the imported data is of LDAP type.
LDAP target – the LDAP OU definition associated with this data source.
Step 8. Select/Create a Transform Map for LDAP Data
Transform map is the vehicle for the data movement from import set table to the target table, which here are User or Group table. The LDAP integration uses standard import sets and transform maps.
To specify company to the LDAP configuration, we use scripting. With the help of script we specify the company for which LDAP configuration has been done. Also, reference fields such as Manager are updated by scripts as well.
Step 9. Create and Execute a Scheduled Import
A scheduled import is a common part of the import set functionality that allows administrators to import LDAP data on a regular basis. By default, there are 2 LDAP integration sample scheduled imports:
- Example LDAP User Import
- Example LDAP Group Import
The above imports need to be activated as required.
Verify LDAP Mapping
After creating an LDAP transform map, verify the transform map functioning by refreshing and confirm it is as expected.
- Navigate to System LDAP > Scheduled Loads using filter navigator.
- Click on the LDAP import job that needs to be verified.
- Click on Execute Now.